apollo配置中心安装
环境:
Java:JDK1.8.X
Maven:3.6.0
Mysql:5.7.32
Git: 2.29.2
Apollo: 1.8.2
# Apollo安装使用
# 项目源码下载
方式一(需要安装git/idea或者eclipse):
直接从 Apollo-github (opens new window) 下载最新的源码(当前最新:v1.9.0),通过git clone 命令将源码下载到本地:
git clone https://github.com/ctripcorp/apollo
方式二:
直接去官方下载最新的安装包,下载地址如下:[https://github.com/ctripcorp/apollo/releases (opens new window)
注意,本人是使用方式一,进行下载。github下载太慢,可下载gitee中源码https://gitee.com/apolloconfig/apollo
jar下载地址:https://github.com/apolloconfig/apollo/tags
# 创建数据库
- ApolloConfigDB
- ApolloPortalDB
创建以上两个数据库,运行{you_project_file}\apollo\scripts\sql下的两个sql文件
# 项目打包
将下载下来的 apollo 源码导入到idea中,我们需要关注的几个项目:
| apollo-configservice | apollo-adminservice | apollo-protal |
|---|---|---|
| 配置服务(meta server、eureka) | 配置管理服务 | apollo管理UI |
找到 /apollo/scripts/build.bat(Linux 是 bulid.sh)
rem
rem Copyright 2021 Apollo Authors
rem
rem Licensed under the Apache License, Version 2.0 (the "License");
rem you may not use this file except in compliance with the License.
rem You may obtain a copy of the License at
rem
rem http://www.apache.org/licenses/LICENSE-2.0
rem
rem Unless required by applicable law or agreed to in writing, software
rem distributed under the License is distributed on an "AS IS" BASIS,
rem WITHOUT WARRANTIES OR CONDITIONS OF ANY KIND, either express or implied.
rem See the License for the specific language governing permissions and
rem limitations under the License.
rem
@echo off

rem apollo config db info
set apollo_config_db_url="jdbc:mysql://localhost:3306/ApolloConfigDB?characterEncoding=utf8"
set apollo_config_db_username="root"
set apollo_config_db_password=""

rem apollo portal db info
set apollo_portal_db_url="jdbc:mysql://localhost:3306/ApolloPortalDB?characterEncoding=utf8"
set apollo_portal_db_username="root"
set apollo_portal_db_password=""

rem meta server url, different environments should have different meta server addresses
set dev_meta="http://localhost:8080"
set fat_meta="http://someIp:8080"
set uat_meta="http://anotherIp:8080"
set pro_meta="http://yetAnotherIp:8080"

set META_SERVERS_OPTS=-Ddev_meta=%dev_meta% -Dfat_meta=%fat_meta% -Duat_meta=%uat_meta% -Dpro_meta=%pro_meta%

rem =============== Please do not modify the following content ===============
rem go to script directory
cd "%~dp0"

cd ..

rem package config-service and admin-service
echo "==== starting to build config-service and admin-service ===="

call mvn clean package -DskipTests -pl apollo-configservice,apollo-adminservice -am -Dapollo_profile=github -Dspring_datasource_url=%apollo_config_db_url% -Dspring_datasource_username=%apollo_config_db_username% -Dspring_datasource_password=%apollo_config_db_password%

echo "==== building config-service and admin-service finished ===="

echo "==== starting to build portal ===="

call mvn clean package -DskipTests -pl apollo-portal -am -Dapollo_profile=github,auth -Dspring_datasource_url=%apollo_portal_db_url% -Dspring_datasource_username=%apollo_portal_db_username% -Dspring_datasource_password=%apollo_portal_db_password% %META_SERVERS_OPTS%

echo "==== building portal finished ===="

pause
2
3
4
5
6
7
8
9
10
11
12
13
14
15
16
17
18
19
20
21
22
23
24
25
26
27
28
29
30
31
32
33
34
35
36
37
38
39
40
41
42
43
44
45
46
47
48
49
50
51
52
53
54
55
56
更改数据库连接配置
rem apollo config db info
set apollo_config_db_url="jdbc:mysql://localhost:3306/ApolloConfigDB?characterEncoding=utf8&serverTimezone=GMT%2B8"
set apollo_config_db_username="root"
set apollo_config_db_password="root"

rem apollo portal db info
set apollo_portal_db_url="jdbc:mysql://localhost:3306/ApolloPortalDB?characterEncoding=utf8&serverTimezone=GMT%2B8"
set apollo_portal_db_username="root"
set apollo_portal_db_password="root"
2
3
4
5
6
7
8
9
10
更改 meta server(apollo-configservice/apollo-erueka) 地址
set dev_meta="http://localhost:8080"
set fat_meta="http://someIp:8080"
set uat_meta="http://anotherIp:8080"
set pro_meta="http://yetAnotherIp:8080"
2
3
4
执行/apollo/scripts/build.bat(Linux 是 bulid.sh)
执行build.bat是进行maven的package命令,打包成功后依次打开apollo-configservice apollo-adminservice apollo-protal 项目的target目录,将jar复制出来(方便启动);
# 项目启动
依次启动服务====================>>> apollo-configservice apollo-adminservice apollo-protal
java -jar apollo-configservice-1.5.0-SNAPSHOT.jar
java -jar apollo-adminservice-1.5.0-SNAPSHOT.jar
java -jar apollo-portal-1.5.0-SNAPSHOT.jar
2
3
访问:http://localhost:8080/ 出现页面说明系统正常
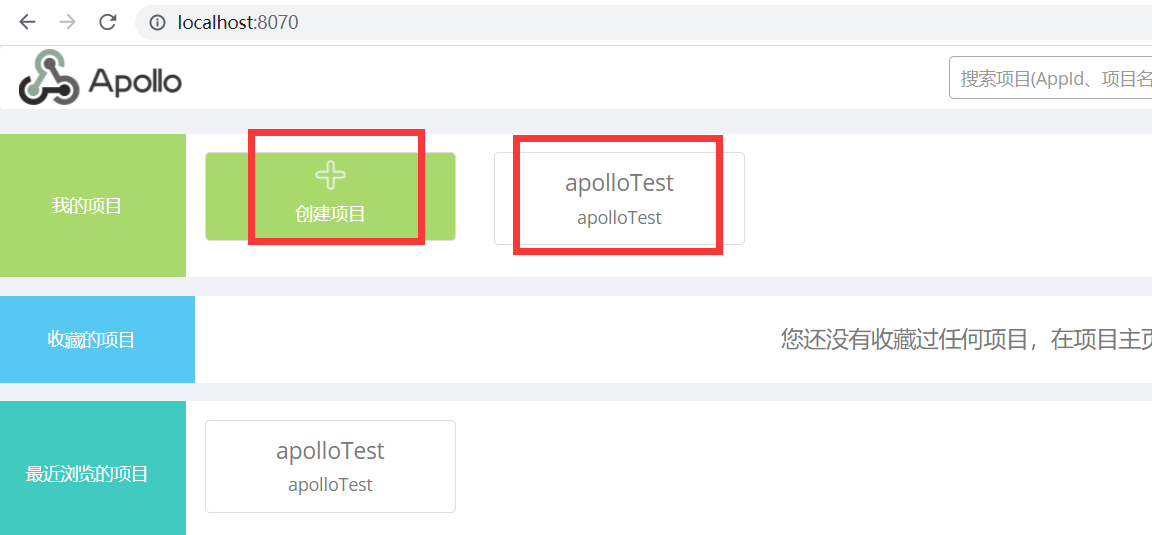
访问:http://localhost:8070/ 登录进行配置 默认用户名密码 apollo/admin
# Apollo客户端使用
# 创建应用配置
创建一个项目
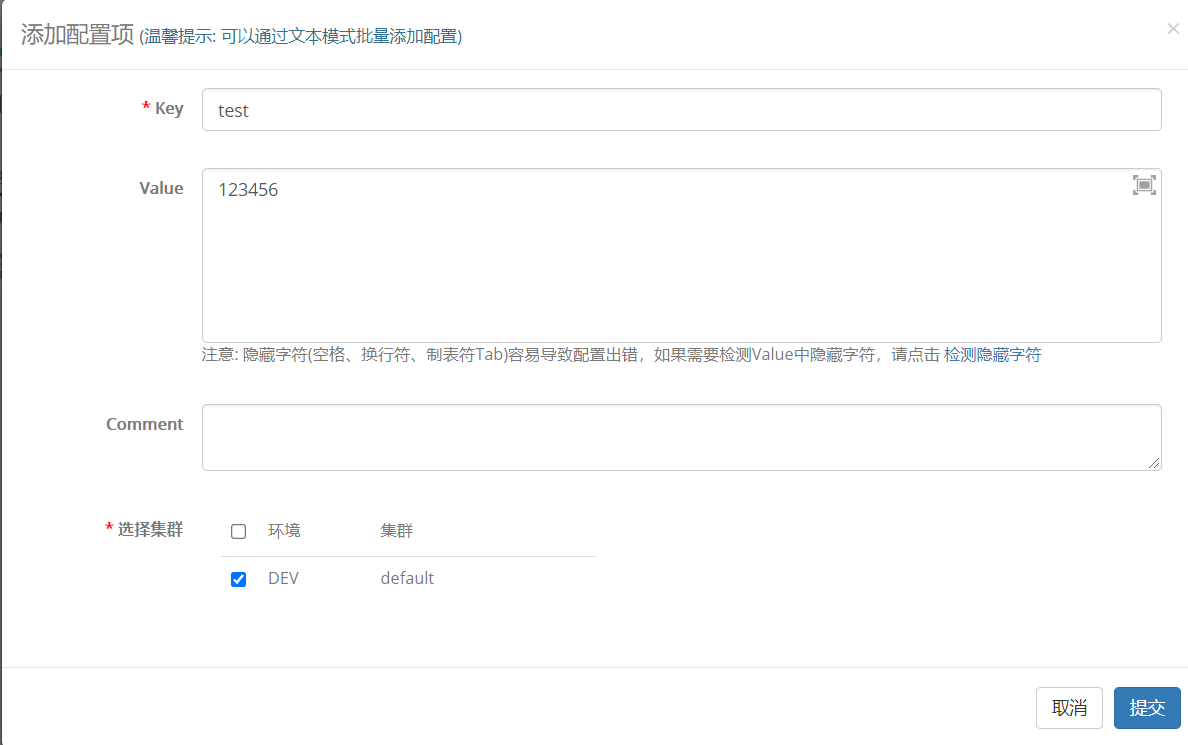
打开application配置文件,新增配置后进行发布
# springboot中使用配置中心
1.项目中引入apollo客户端依赖包
<dependency>
    <groupId>com.ctrip.framework.apollo</groupId>
    <artifactId>apollo-client</artifactId>
    <version>${apollo.client.version}</version>
</dependency>
2
3
4
5
2.在application.properties/yaml文件中设置 app.id app.meta即可
- **app.id:**应用id
- **apollo.meta:**Apollo 配置中心地址。
- **apollo.bootstrap.enable:**是否开启 Apollo
- **apollo.bootstrap.namespaces:**指定使用哪个 Namespace 的配置,默认 application,多个配置用
,逗号隔开 - **apollo.bootstrap.eagerLoad.enabled:**将 Apollo 加载提到初始化日志系统之前,如果设置为 false,那么将打印出 Apollo 的日志信息,但是由于打印 Apollo 日志信息需要日志先启动,启动后无法对日志配置进行修改,所以 Apollo 不能管理应用的日志配置, 如果设置为 true,那么 Apollo 可以管理日志的配置,但是不能打印出 Apollo 的日志信息。
server.port=8888

# 应用id
app.id=apolloTest
# Apollo 配置中心地址。
apollo.meta=http://localhost:8080
#是否开启 Apollo
apollo.bootstrap.enable=true
# 指定使用哪个 Namespace 的配置,默认 application
apollo.bootstrap.namespaces=application
#是否在加载日志系统前加载Apollo配置
apollo.bootstrap.eagerLoad.enabled=false
2
3
4
5
6
7
8
9
10
11
12
==注意:因为我是本地启动的apollo,所以本地项目要修改端口号==
3.springboot启动类添加@EnableApolloConfig注解
4.新建controller进行测试
@RestController
public class ApolloTestController {
@Value("${test}")
String config;
@ApolloConfig("application")
private static Config apolloConfig;
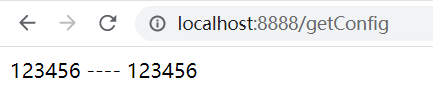
@RequestMapping("/getConfig")
public String getConfig() {
return config + " ---- " + apolloConfig.getProperty("test", "");
}
}
2
3
4
5
6
7
8
9
10
11
12
13
14
注入配置方式:
1.通过spring的@Value注解进行注入
2.通过@ApolloConfig注解注入到Config类中,传入对应配置的命名空间,通过getProperty方法获取配置
5.请求controller